For my next project, I tried to gain more experience with Node and Rollbase by creating a simple blogging app. I based my project on the angular-express-blog, which took care of the Angular aspects of the application. Because of this, I primarily worked on the api.js part of the project to change it from storing data locally to storing data using the Rollbase REST api. To follow along, you can view the GitHub project at https://github.com/progress/angular-rollbase-blog.
The first part of the project was setting everything up on Rollbase. I created a test account on Rollbase so that I would be able to store my data easily.

I then made a new project and then created a new object to represent posts. My post object contained two important fields, the Post field (the title/name of the post, which was automatically created) and the text field (the contents of the post, a field that had to be added). If you don’t want to go through the process of making your own project, you can instead just import the existing project onto Rollbase. To do so, follow these instructions: https://mendoncakeegan.wordpress.com/2014/08/28/importing-an-existing-rollbase-project/ using the XML file in the GitHub repo.


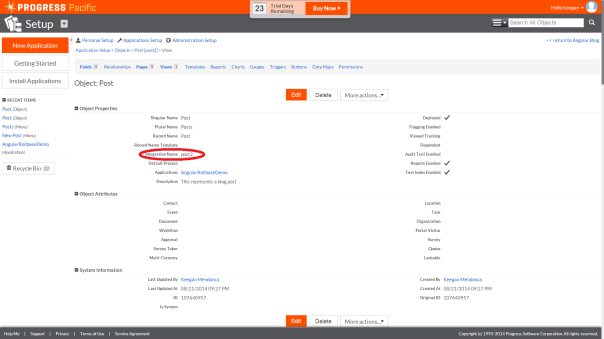
After creating the post object, it was given the integration name (accessed at (Application Setup > Objects > Post), ‘post2’ which is what I would use for referencing posts during API calls.
I also edited the permissions, so that both the Administrator and Query API would be able to View, Create, Edit, and Delete objects.


I also accessed the posts view (Application Setup > Objects > Post > All Posts) to get the unique viewId, which I would use in API calls to see all my current posts.


By default this view of all the posts is sorted by age, which worked perfectly for the blog application I was planning on making.
After setting everything up on Rollbase, I then proceeded to change the api.js file, which had been storing all the data in the angular-express-blog I was basing my project on. To access all the information stored in the Rollbase database, I needed to first login and receive a sessionId, which would allow me to make the rest of the API calls. The process for logging in was relatively simple, as I was just accessing a URL and receiving a JSON object in return. (For most of the API calls, I had the option to get results in XML or JSON form, and I generally preferred JSON.) After getting the sessionId, I was able to populate my local database using the data from Rollbase through a getPage call with my viewId and sessionId. Most of the rest of the API calls were similar and relatively straightforward, and soon I had a working blog app being hosted on my computer.
The final part of the project was deploying the project so that it would be publicly accessible. To do this, I had to modify the app.js file so it would use the appropriate port, instead of just defaulting to 3000, when deployed on Modulus. I then deployed the project by uploading the zipped project to Modulus. Instead of uploading the zipped file, I could have also used Modulus’ command line tool to create the project. If you are unfamiliar with Modulus, you can read up on getting started at https://modulus.io/codex/getting_started.
The simple blog application can be viewed at: http://angularrollbase-21755.onmodulus.net/.

2 thoughts on “Angular Rollbase Blog”